Designer - Generating code
Preface
Generating code is the end result of a design process in the designer. It will take your project definition and
with the settings you set for the generation process, it will generate source code and/or produce other output, depending
on which tasks you have selected to run and for example which templates you've selected to use. This section describes the elements you
can configure for the generation process.
Configuring the generation process
When you press F7 or select 'Generate' in the Project menu or from its context menu, the 'generation process configure
dialog' pops up to let you set up the generation process.
This dialog consists of three main areas, where each area is placed onto a tab, accessable at the top of the dialog. These three areas are discussed below.
When a code generation cycle is started by clicking the
Start generator button, all settings you've specified in this dialog are preserved inside the
project. If you want to re-use these settings when you have to re-generate the code, it's key to save your project
after you've generated code. If you're
generating code after you've already generated code before and you don't change anything, the project isn't marked as changed as well, so you don't have to save
in that situation.
Right after you've pressed F7 or clicked the 'Generate' menu option, LLBLGen Pro will raise the Designer event
CodeGenerationBeforeStart. This event has an auto-bound plug-in, the Project Verifier plug-in. This plug-in is used to check for some errors in the project which could lead to compile problems. It currently checks for one problem, namely inherited Field mapped onto relation instances which have the same name as a Field mapped onto relation in the same entity. Example: Manager derives from Employee. Employee has a relation with Department (Employee.WorksForDepartmentID - Department.DepartmentID) and by default the field 'Department' is mapped onto that relation in Employee. Manager also has a relation with Department (Manager.ManagesDepartmentID - Department.DepartmentID) and that relation also has by default a field named 'Department' mapped onto it. This isn't overriding the inherited field Employee.Department, as that represents a different relation. As these things go undetected often, the Project Verifier tries to detect them before code generation takes place. If it finds such a problem as described above, it will cancel the code generation configuration and display the error in the log viewer so you can correct it.
The plug-in can be extended by you by using the sourcecode of the plug-in from the SDK.
General settings tab
The General settings tab is the tab where you start with. It contains various parameters for the code generation process which will influence the contents
and options available to you on the other two tabs. An example of the General settings tab is shown below:
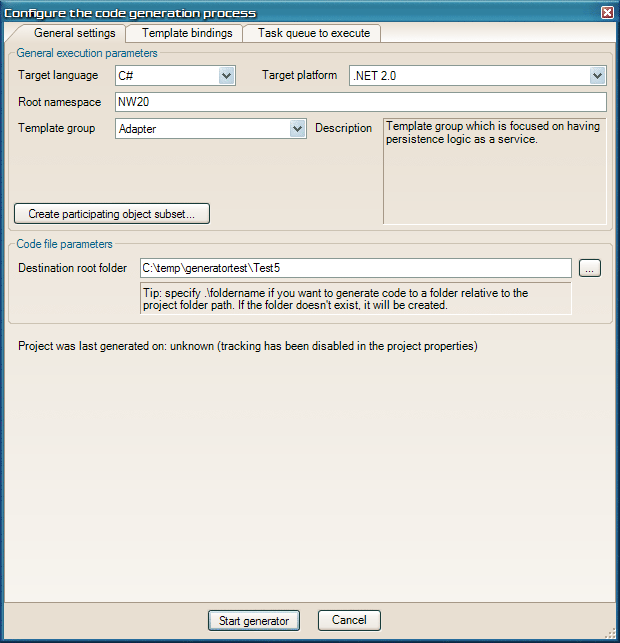
General settings tab
General execution parameters
Start by selecting the
Target language you want to use. This is the language the generated code
will be in.
The next step will be to select which
Target platform you are generating code for. Make sure you select the right platform, as it influences the
templates available to you and for example the visual studio project file formats. Not all platforms are available for all databases. For example, the Compact Framework platforms are only selectable if your project is based on a SqlServer catalog. .NET 2.0 is the default platform.
After you've made the selection for the target platform, you've to specify the
Root namespace in the root namespace textbox.
This root namespace textbox is filled with the root namespace defined in the
project properties.
Say, you've defined it as "SD.Northwind", then the namespaces in the generated code all start with 'SD.Northwind', so
the namespaces in the code will look like 'SD.Northwind.CollectionClasses' or 'SD.Northwind.Entities'.
 Note for VB.NET users: Note for VB.NET users:
|
|
If you decide to add the generated code files manually to
an existing VB.NET project in Visual Studio.NET, keep in mind that the VB.NET project in Visual Studio.NET has defined as its 'Root namespace' the
project name and this name will be used as a prefix to all defined namespaces in the generated code. This will lead to non-compileable code.
To avoid this, clear the 'Root namespace' textbox in the properties dialog of the VB.NET project in Visual Studio.NET.
It's recommended however that you use the generated Visual Studio.NET project file, because it already is set up correctly and contains already the
correct references.
|
When the root namespace has been defined, you'll pick the
template group you want to use for your generated code. If you're unfamiliar with what a
template group is, please see
Concepts - Templates and Template groups to inform yourself of the differences between
the available template groups and which one you should select for your project.
At tab 3, Task queue to execute, you can specify additional root namespaces and destination folders per task group. This is described more in detail below.
With the button
Create participating object subset... you can create a subset of the objects to generate code for. By default, the complete project is
used for code generation so you don't need to specify anything and you can safely leave this button alone. However some scenario's, for example small tests,
may require that you create a subset of the project elements and generate code for these elements.
To specify a subset, click on the
Create participating object subset... button.
This button opens a form with the object selector already discussed in the plug-ins section. For more information about this object selector, please
see:
selecting participating objects. The object selector opened when the
Create participating object subset... button is clicked shows no object being selected. This gives you a clean slate to define
participating objects. If you decide not to use a subset, simply click
Cancel. If you don't check any object and click
OK, a warning is
shown to inform you that you've created an empty subset and you can then decide to discard this empty subset and use the whole project, or use the empty
subset. You can also manage the subsets by right-clicking the project node in project explorer and then by selecting
Manage object groups from the context menu, or by selecting
Manage object groups from the Project menu in the LLBLGen Pro designer menu.
Code file parameters
The generated code has to be stored in a directory, and you can define that directory in the
Destination root folder textbox.
Be careful which directory you choose, because all code files, as well as each directory created
by the task performers, are created in that directory or subdirectories of that directory.
You can specify a relative path from the location the project file was loaded from. For example, if you have a folder called 'MyBigProject' and in that
folder you've defined two folders: LLBLGenProProject and VS.NETProject, the LLBLGen Pro project file is located in the LLBLGenProProject folder.
To generate code in the VS.NETProject folder, simply specify ..\VS.NETProject as the Destination root folder. Paths starting with '..\' or '.\' (without
the quotes) are recognized as relative paths.
You'll notice you're now able to generate code as the
Start generator button is enabled. Though it's recommended to examine the other two tabs' contents
as well before proceeding, at least the first time you generate code for a project.
Template bindings tab
The Template bindings tab is the tab where you define the precedence of the template bindings to use. An example of the template bindings tab is shown below:
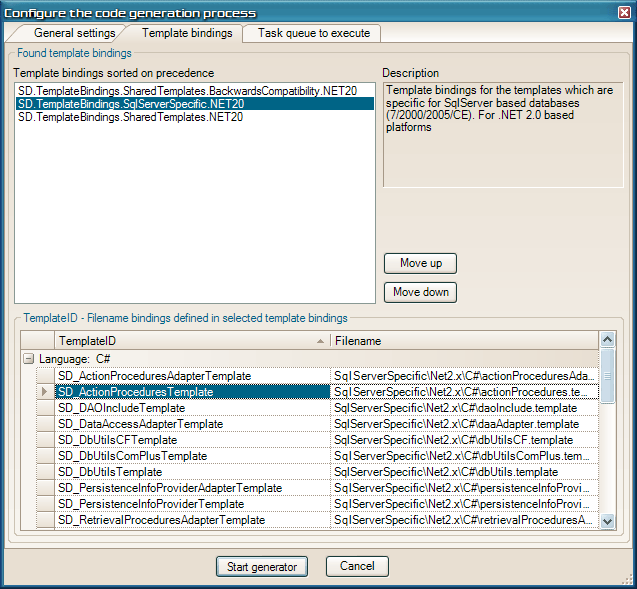
Template bindings tab
As discussed in
Concepts - Templates and Template groups, LLBLGen Pro uses template files which are bound to a TemplateID.
These bindings are defined in so called template bindings files. On the
Template bindings tab you'll see all found template bindings files and their contained
TemplateID - template file bindings for the target platform you've chosen on the
General settings tab and the target database type.
TemplateID precedence
LLBLGen Pro ships with a standard set of templates and accompanying template bindings files. For some templates there are multiple versions, like the ResultsetFields
templates: one version which generates code as it was done in LLBLGen Pro v1.0.2005.1 and one which is slightly modified and generates different code which is more
compact, and which is new for V2.x of LLBLGen Pro. The former template, the one which generates code like v1.0.2005.1, is bound to the particular templateIDs in the
templatebindings file called "SD.TemplateBindings.SharedTemplates.BackwardsCompatibility.NETxx", where xx is the target platform version number. The latter is defined
in the standard templatebindings file called "SD.TemplateBindings.SharedTemplates.NETxx".
Both bind different files to the same TemplateIDs.To place one
templatebindings file
above the other one, it
overrules the templatebindings to the same TemplateIDs. In the screenshot above, the backwards
compatibility templatebindings file is placed
above the standard shared templates templatebindings, which means that for the TemplateIDs which are in
both templatebindings files (in this case
SD_ResultsetFieldsAdapterTemplate and
SD_ResultsetFieldsTemplate), the files bound in the
backwards compatibility templatebindings file are used, because those templateIDs
take precedence over the ones in templatebindings files placed
below it.
You can change the precedence of a templatebindings file by selecting it and then by clicking the move up/down buttons at the right of the list. The order in which
the templatebindings are placed at the time the code generation is started is preserved in the project file.
You can use this mechanism also to
overrule a template binding in the standard bindings to use your own version of a shipped template. See for more information
about how to create your own templatebindings files the LLBLGen Pro SDK documentation.
Task queue to execute tab
The Task queue to execute tab is the tab where you select and define the different tasks which should be executed during code generation.
If you're unfamiliar with the concept of tasks and taskgroups, please see:
Concepts - task based code generation.
Two examples of the Task queue to execute tab is shown below:
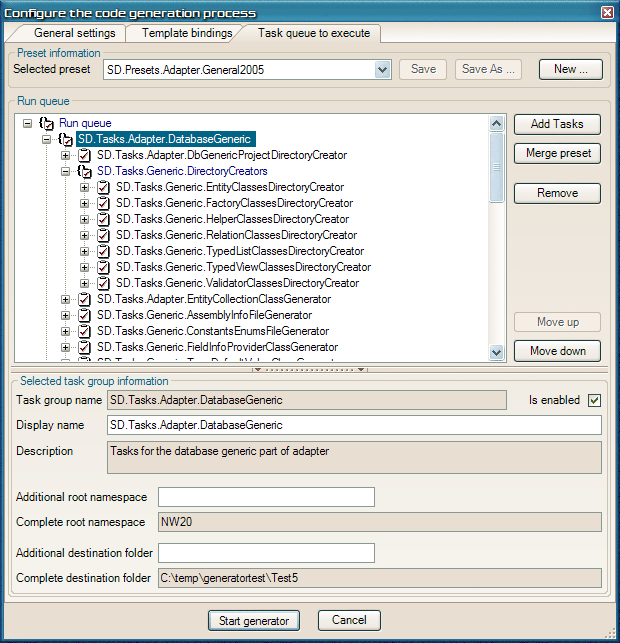
Task queue to execute tab with task group selected
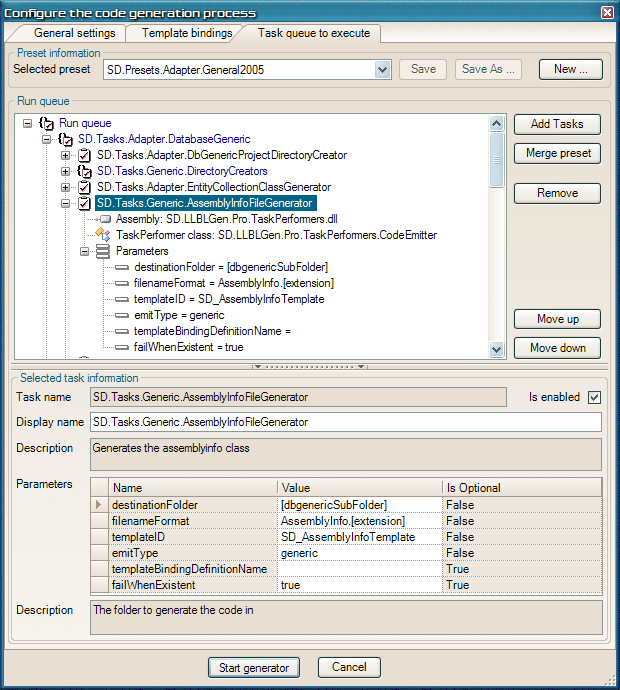
Task queue to execute tab with a task selected
At the top of the Task queue to execute tab, you're able to select your
preset of choice. A preset, as discussed in the aformentioned
Concepts - task based code generation, is a definition of a
run queue, with tasks and task groups in
the right order, with the right values for the task parameters. When you select a task group in the run queue (task groups have a blue color and a different icon, and are used to group tasks together), you'll see the
Selected task group information below the run queue as shown in the first
Task queue to execute tab screenshot. This area allows you to specify an additional root namespace and additional destination folder as suffix for the already known root namespace and destination folder for that task group. This information is stored inside the preset and nested groups will use the information of their parents.
You can also specify a
display name for task groups and tasks in the run queue which is persisted in the preset. These names could help you understand better which tasks do what exactly if you for example add multiple times the same task but with different parameters. To change the display name for a task or task group, you can also select it in the run queue tree and press F2.
You can create new presets if you like, by simply clicking the
New... button or
by changing an existing preset and then by clicking the
Save As... button to save it under a different name. The shipped presets are
sealed. This
means that LLBLGen Pro doesn't let you alter them through the GUI to avoid you overwriting the shipped presets by mistake. You can also seal your own presets,
by checking the checkbox on the save dialog as shown below:

The Save preset dialog
The run queue itself, the queue of tasks which will be executed when you click
Start generator in a top-down fashion, so the tasks at the top of the queue
will be executed first, is displayed as a tree, as you can see in the screenshot above. There are several ways to change the run queue of a given preset. First
of all, you can add
new tasks or taskgroups to the run queue. To do so, first select the task or taskgroup in the run queue which will mark the position
where the newly added tasks will be inserted. Then you click the
Add Tasks button. This button will pop up the following dialog:
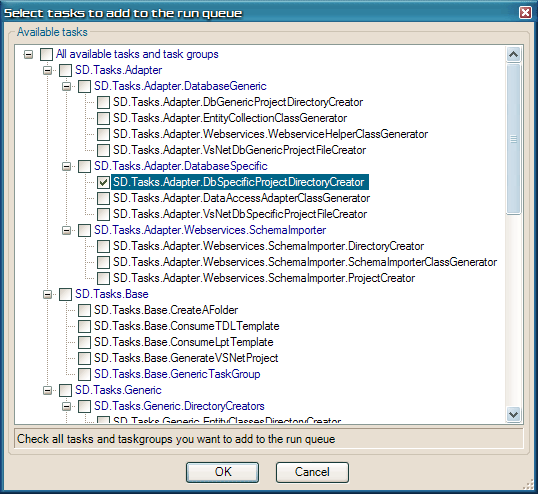
The Add Tasks dialog
In this dialog you check the checkboxes of any task or taskgroup you want to add to the run queue and then click
OK. The tasks will be added with their
default parameters. You might want to alter these, please see 'Altering an existing tasks' parameters' below for details on that.
You can also decide to remove a task or taskgroup. To do that you select the task or taskgroup to delete from the run queue and then you click the
Remove
button. An alternative to removing a task is
disabling a task. In the shipped presets, several tasks are disabled by default, like the tasks which
generate the PredicateFactory and the SortClauseFactory classes. As these classes aren't used in LLBLGen Pro v2, they're disabled by default so they'll be skipped
at generation time. To make it easier for users to include them in their run queue, for example because they're upgrading from v1.0.2005.1 code, the tasks
are already added to the presets. The user then just has to select them and check the
Is enabled checkbox in the Selected task information area.
To change the order in which tasks are executed, you can use the
Move up and
Move down buttons. These work on the selected task or taskgroup.
To merge another preset with the one loaded in the run queue, at the spot currently selected, click the
Merge preset button. A dialog will pop up with a drop-down list with all the presets you can merge at that spot. By clicking OK, the preset you've selected will be merged at the spot you had selected in the run queue.
Altering an existing tasks' parameters
By selecting a task in the run queue you can change its parameters in the Selected task information. Which parameters are available depends on the task and
the associated
Task performer class. You can see which task performer class is associated with a task by expanding the task node in the run queue.
In general you don't need to alter parameters, or add tasks to use LLBLGen Pro: the shipped presets are enough to generate code. If you want to customize the
generation process, it's recommended you read the LLBLGen Pro SDK documentation which contains more detailed information about the various parameters of the
tasks available.
Most task parameters are straight forward. When you select a parameter in the Parameters grid, the bottom Description area shows the description of the selected
parameter so you know what to specify as a value.
Starting the generation process
When you are done with the configuration of the generation process, you can start the generator by clicking 'Start generator'.
The generator and the task performers will log the outcome of their actions in the application output window, so it can
be helpful to examine that output after the generation process has been completed to check if the generator has
performed its actions as you had planned it should.
The generator will also show a detailed generation report to you and will show errors in red. If you've set
ShowTaskPerformerReport to false
in the
user preferences, this report is not shown. You can save the report contents as .rtf or as xml.


 Note for VB.NET users:


